How to Write a Form as a Service Provider with Fluum
Running a business is about much more than just offering great services. Behind every smooth operation lies good communication, proper documentation, and tools that keep everything organised and professional.
One of those essential tools is the client form. In this article, we’ll explore why client forms are key, how to write them effectively, and how to set them up in Fluum to streamline your workflow.
What Is a Client Form?
A client form is a digital document that gathers important information from your clients before, during, or after they receive your service. Think of it as your business’s way of staying informed, compliant, and prepared.
In industries such as wellness, coaching, or beauty, client forms can include details like health conditions, service preferences, or consent confirmations. They ensure you have all the necessary information to deliver a safe, customised, and professional experience.
With client forms, you not only make your workflow more efficient but also strengthen communication and trust with your clients.
Why Are Client Forms Important for Small Businesses?
1. Keep Operations Organised
Client forms centralise all client data, from personal details to service history, helping you stay organised and efficient.
2. Improve Communication and Transparency
By collecting essential details upfront, forms open the door for clear and transparent communication. Clients know what to expect, and you know exactly how to meet their needs.
3. Deliver Personalised Services
Well-crafted forms help you tailor your service to each client’s needs and preferences. Whether it’s a fitness assessment, skin consultation, or coaching intake form, the data you collect ensures every session feels personalised.
4. Showcase Professionalism
Requesting clients to complete a form before their session demonstrates that your business is structured, professional, and committed to excellence.
Steps to Create a Form on Fluum
1. Subscribe to the GROW Plan

Before creating your first form, make sure you’re subscribed to the GROW Plan on Fluum. This plan gives you access to advanced tools for managing clients, automating communication, and securely storing completed forms.
How to Subscribe:
- Log in to your Fluum account
- Go to Plans & Billing
- Select the GROW Plan and follow the prompts
2. Head to “Forms” & Add a New Form

From your Fluum dashboard, select Forms from the side menu, then click Add New Form. This will open the form builder where you can start designing your document.
3. Create a Title and Description for the Form

Choose a clear, professional title and write a short description to help clients understand what the form is for.
Examples of Effective Titles:
- “Wellness Intake Form”
- “Coaching Session Preparation Form”
- “Massage Client Information Sheet”
- “New Client Consultation Form”
Examples of Clear Descriptions:
- “Please complete this form to share any relevant information before your wellness session.”
- “This form helps us understand your goals and tailor your coaching experience.”
4. Add Questions or Text Blocks & Save

The Fluum form builder allows full customisation with text sections and interactive questions.
Text Blocks: Add disclaimers, policies, or instructions.
Questions: Include multiple-choice fields, open text areas, or consent checkboxes.
Example Text Blocks:
- “Please disclose any relevant health conditions before your session.”
- “Your information will be kept confidential and used only for service-related purposes.”
Example Questions:
- “Do you have any medical conditions we should be aware of?”
- “Have you read and accepted the terms above?”
Once finished, click Save to store your form.
5. Attach the Form to a Listing
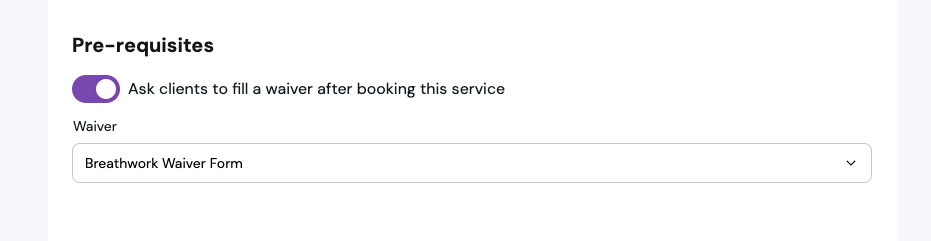
After your form is ready, attach it directly to a service listing so clients automatically receive it when booking.
How to Attach a Form:
- Go to Listings
- Select your service (e.g., “Private Breathwork Session”)
- Under the Form section, choose the one you created
This ensures the right form goes to the right clients every time.
6. Automatic Sending of Forms Upon Booking6. Automatic Sending of Waivers Upon Booking

Fluum automates the entire process, when a client books a service, they automatically receive the required form to complete online.
What This Means for You:
- No more chasing clients manually
- Clients complete forms before sessions
- Faster, smoother onboarding
It’s simple, efficient, and eco-friendly.
7. Form Data Stored in Client Profiles (CRM)
Once submitted, forms are securely saved in each client’s profile within your CRM.
Benefits:
- Quick access to all client details
- GDPR-compliant storage
- Complete service history in one place
This keeps your business organised, compliant, and ready for anything.
Tips for Writing an Effective Client Form
- Keep It Simple: Use clear, friendly language.
- Be Transparent: Let clients know why the information is needed.
- Focus on Relevance: Only ask for details that are essential to your service.
- Include Consent Sections: Make sure clients acknowledge terms and privacy policies.
- Test and Update Regularly: Review your forms to ensure they remain up to date and easy to complete.
Common Mistakes to Avoid
- Asking unnecessary questions that overwhelm clients
- Forgetting to attach the form to a service listing
- Failing to update outdated content or policies
- Not storing completed forms properly
Final Thoughts
Creating effective client forms might sound time-consuming, but with Fluum, it’s fast, intuitive, and professional.
By setting up well-structured forms, you save time, enhance communication, and provide a seamless experience for every client — all while keeping your business protected and organised.
Ready to create your first waiver form? Subscribe to the GROW Plan today and experience the Fluum difference!
Leave a Reply